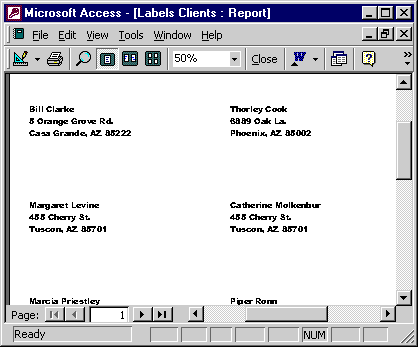
Creating Mailing Labels - Exercise Result
Here is what your report should look like. Remember that if you chose a different label size, you may see more or fewer addresses on a page.
Incorporating mailing labels into a Microsoft Access report necessitates precision and thoroughness, as the output will potentially serve as a formal communication channel between an organization and its stakeholders. This process involves selecting the source data, configuring the label layout, and customizing text or design elements to meet the required specifications.
Step 1: Identify Data Source
First and foremost, identify the data source that contains the address information. This source may be a table or a query within your Microsoft Access database. Ensure that it contains fields for name, street address, city, state, and postal code.Step 2: Create a New Report
- Navigate to the Report Wizard: Open Microsoft Access, go to the “Create” tab, and select the “Report Wizard” option.
- Choose Data Source: Select the table or query that contains the mailing address fields.
Step 3: Configure Label Dimensions
- Select Report Type: The Report Wizard will ask what type of report you want to create. Select "Label."
- Choose Label Size: You will be prompted to specify the dimensions for the labels. These should correspond to the physical label sheets you'll be printing on. Microsoft Access provides several standard label dimensions; choose the one that matches your label sheets.
Step 4: Arrange Fields
- Field Selection: The wizard will display a list of available fields from your data source. Select those you wish to include on the label—typically, name, street address, city, state, and postal code.
- Field Sequencing: Arrange the fields in the order they should appear on the label.
Step 5: Text Customization
- Font and Style: Once the fields are in place, you may specify the font, size, and style for the text that will appear on the labels.
- Text Alignment: Align the text appropriately, usually center or left-aligned, depending on your design requirements.
Step 6: Preview and Refinement
- Report Preview: Before finalizing, preview the report to ensure that all elements are aligned correctly and that the text fits within the boundaries of the labels.
- Modifications: If necessary, return to previous steps to make modifications in field selection, arrangement, or text customization.
Step 7: Save and Generate Report
- Save Configuration: Once you're satisfied with the preview, save the report configuration.
- Report Generation: Execute the report to generate a viewable and printable set of labels.
Key Considerations:
- Data Validation: Ensure data integrity by confirming that the data source is up-to-date and accurate.
- Usability: If these labels will be used frequently, consider saving this report for future use to avoid duplication of effort.
- Testing: Perform a test print on a blank sheet of paper to verify alignment before printing on the actual label sheets.
- Security Compliance: Verify that you're in compliance with data protection regulations when handling and printing mailing labels, especially if they contain sensitive information.